

Diplomate American Board of Orofacial Pain
9615 Brighton Way, Suite 323
Beverly Hills, CA 90210
888.981.8981


Mandibular Advancement Devices for Snoring and Sleep Apnea
If you have been diagnosed with obstructive sleep apnea, that means you stop breathing when you are sleeping for 10 seconds or longer, which is called apnea, or the amount of oxygen in your blood decreases by a certain percentage for a certain amount of time, which is called hypopnea, or any combination of the two. During a sleep test, there is a score that is called the AHI, which is the apnea hypopnea index. If you have 5 to 14 events per hour where you stop breathing for 10 seconds or more and/or you have a reduction in the amount of oxygen in your blood, then we consider that to be a mild case of obstructive sleep apnea. If you have 15 to 29 of these events per hour, then we consider that to be a moderate case of obstructive sleep apnea. If you have 30 or more of these events per hour, which is an event at least every 2 minutes, then we consider that to be a severe case of obstructive sleep apnea.
The gold standard for obstructive sleep apnea is a CPAP machine, which stands for continuous positive airway pressure. This is a device that is usually worn with a mask over the face to allow a constant stream of air to flow through the nose to keep the airway open during sleep. However, compliance with a CPAP is only about 50%, and traveling with a CPAP is not very convenient. For patients with mild to moderate cases of obstructive sleep apnea, a mandibular advancement device is an option if they have good range of motion of their jaw, they can move their jaw forward a normal amount, and their teeth, gums, and jaw bones are in normal condition.
Am I a Candidate for a Mandibular Advancement Device?
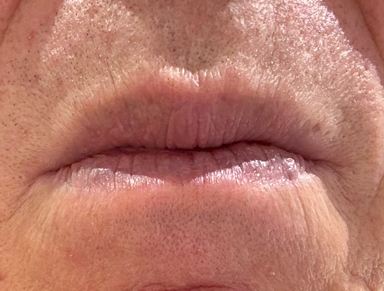
To determine if a mandibular advancement device will help a patient, there are a couple of important factors to consider. First, you need to be in good dental health. This means you have recently been to the dentist, you don't need any dental treatment, and your gums and bones that hold the teeth in place are in good condition. Dr. Hirschinger does not suggest starting the process until any jaw and/or TMJ pain is either greatly reduced or not present. You also need to be able to protrude your jaw forward at least 8 mm, which most people can do. You can do a test at home to see if a mandibular advancement device will help you. Hold your teeth together, close your lips, and try to snore. Then separate your teeth by about a finger, close your lips, move your jaw slightly forward, and try to snore. If you have cotton rolls, you can place one cotton roll on each side of your back teeth, close until you feel the teeth touch the cotton rolls, close your lips, and move your jaw slightly forward. If you feel a difference in your ability to breathe and/or the snoring is reduced or eliminated, then a mandibular advancement device will likely help you.
 .
. 
Separate your teeth using one cotton roll on your back teeth on both sides, or about the height of a finger.
Then close your lips and try to snore. Your snoring should be reduced, and it should be easier to breathe.
What is a Mandibular Advancement Device?
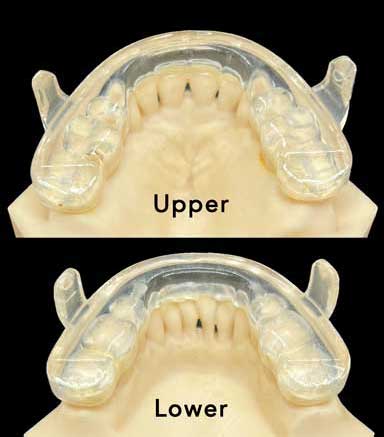
A mandibular advancement device is two appliances that are worn together. One fits on the upper arch, and one fits on the lower arch. The goal of all mandibular advancement devices is to move the jaw forward, which pulls the tongue off the back of the throat, which then opens the airway to allow oxygen to flow to the brain and to decrease or eliminate snoring. There are many mandibular advancement devices on the market. Dr. Hirschinger wears a mandibular advancement device since he snores during sleep. He has worn several different appliances over the years, and he prefers the Prosmonus IA Select appliance for several reasons. One advantage is that it is a 3D printed appliance, which means it does not need to be made by a lab technician, which means the fit is very precise, and if an appliance is lost or chewed by a dog, an exact duplicate can be reprinted by the lab. Another advantage of the Prosomnus appliances is that the appliances are not connected together. When they are, patients can get a feeling of claustrophobia, which decreases comfort and compliance of the appliance. An additional advantage is that the Prosmonus appliances do not cover over the surface of the back the teeth, which is especially critical of the upper appliance since this is where the tongue should rest. If the appliance covers over the back surface of the teeth, the tongue will have less space and will be pushed back, which defeats part of the purpose of the appliance since we want the appliance to move the tongue off the back of the throat. Lastly, there is no hardware with the Prosmonus appliance.
Dr. Hirschinger used to wear a Herbst appliance until the Prosmonus appliance came onto the market. The photos below are of the Prosmonus appliance Dr. Hirschinger currently wears and of the Herbst appliance that he used to wear. Please read the text below the photos to learn more about the type of mandibular advancement device Dr. Hirschinger recommends for his patients in his private practice, which is located in Beverly Hills, California.
Currently Recommended Prosomnus |
Previously Recommended Herbst |
 |
 |
|
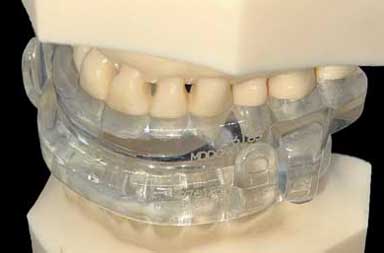
This is the Prosomnus appliance. You can see the back of the front teeth on the upper and lower arches. This means the tongue has room to rest against the back of these teeth, which increases the effectiveness of the appliance. |
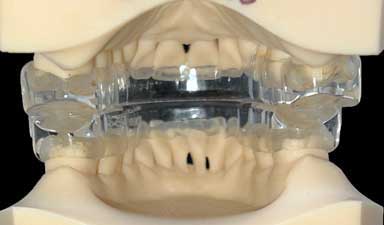
This is the Herbst appliance. You can see the appliance covers over the back of the front teeth on the upper and lower arches. This forces the tongue to move back, which decreases the effectiveness of the appliance. |
 |
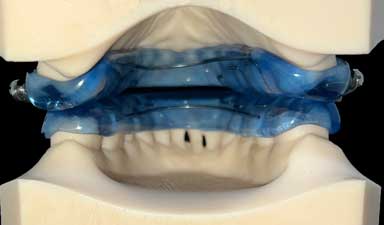 |
| This is the view from the tongue when the Prosomnus appliances are being worn together. You can see that the appliances only cover a little bit of the back of the teeth. Since the appliance is 3D printed, the fit is very precise and thin on the inside. | This is the view from the tongue when the Herbst appliance is worn. You can see the appliance covers the back of the upper and lower teeth, which pushes the tongue backwards. This removes some of the effectiveness of the appliance. |
 |
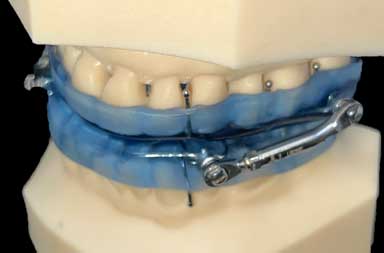 |
| This is a view of the side of the Prosomonus appliance. The bars, which you can clearly see in the top photo, meet to hold the lower jaw forward, which opens the airway. This appliance is thicker on the lip side than the tongue side but that is preferred since the tongue side needs room for the tongue. | This is a view of the side of the Herbst appliance. You can see the hardware that is required to connect the upper and lower appliances. Most patients adapted to the hardware but some did not, which is one of the reasons Dr. Hirschinger now uses appliances without any hardware. |
What Needs to be Done After Wearing a Mandibular Advancement Device?
Every morning you need to stretch your lateral pterygoid muscles, which is the muscle that enables you to move your jaw forward, and move it side to side. This muscle is held forward by the appliance when you are sleeping so you need to stretch it back in the morning after removing your mandibular advancement device. Dr. Hirschinger will give you a bite wafer, which one of his patient's called a "chew toy," to stretch the lateral pterygoid muscles. You place your upper front four teeth on the wafer, and squeeze your back backwards for 10 seconds, rest for a few seconds, and repeat this two more times. Then check your bite. It should feel the same as it did before you started wearing the mandibular advancement device. If it doesn't feel normal, repeat this the same steps for another three repetitions. Some patients need to repeat this up to six times each morning until their bite feels normal. This is only done in the morning.
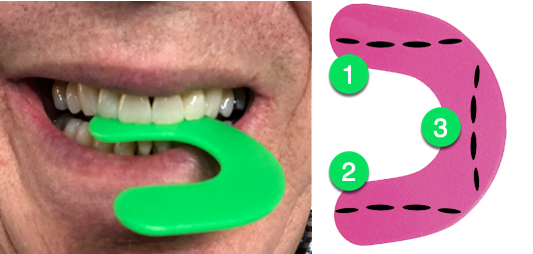
Squeeze and hold the wafer for 10 seconds. Rest and repeat two more times.
The wafer should dip down when used properly. Repeat this until your bite returns to normal.
Once the bite wafer starts to thin, rotate it to a different position as shown in the image above.